Showing posts with label chicken. Show all posts

Wednesday, May 19, 2010

Chicken in a Pot

Ah, it's been quite awhile since our last post. Who knew life could get so busy and blogging about food would be last on the list? Well, I feel like we've caught up a bit and I can take some time to write about one of our favorite easy dishes to make.

We saw this recipe on an episode of America's Test Kitchen and had to try it...It's their French Chicken in a Pot. Basically all you need for this recipe is a whole chicken, a dutch oven, and your oven and you're set. We have a nice Lodge pre-seasoned 5 qt. cast iron dutch oven that works for all of our dutch oven needs. It was only $30 on Amazon! It's a great deal compared to the Le Creuset dutch ovens that go for around $250. If you take good care of your cast iron dutch oven, it should be a lasting and cheap choice! (Maybe we'll get a Le Creuset some day, the enamel ones are lovely!)

The best part about this recipe is the end result: the juiciest roast chicken you'll ever have in just under 2 hours!  We've already made this meal several times because it's so irresistibly good! The secret is a hybrid roast/braise in the lidded dutch oven. No liquid is added, so technically it's not a braise, but over time the chicken releases its juices, steam builds up in the dutch oven, and the chicken ends up incredibly tender, moist, and flavorful.

To start off, clean the extra fat and giblets from your chicken and preheat the oven to 250 degrees. Meanwhile, heat up a tablespoon of olive oil in the dutch oven over medium heat until it gets wavy/just starts smoking.  Add the chicken, breast side down, and then throw in some chopped onion, celery, garlic cloves, bay leaf, and rosemary sprigs (we use fresh rosemary from my new herb container garden...yum).  Cook it until it starts to brown (around 5-6 minutes). Flip the chicken breast side up and continue to cook on the stove for 8 more minutes. This way, the white meat wont dry out, and the dark meat will get enough heat to get to the right temperature (160 for white, 180 for dark).

From Kitchen Assays
Browned and ready to go into the oven.

Next, cover the dutch oven with the lid and stick it in the oven. We generally cook ours for about an hour and a half, and then check the temperature with an instant read thermometer. It should be at 160 degrees at the thickest part of the breast when it is fully cooked. You'll notice that the chicken skin will have lost a lot of color, and that the skin looks very unappetizing (we always end up taking off the skin). Don't fret though, it sacrificed itself to flavor the beautiful jus at the bottom of the pot.  We then allow the chicken to rest for 20 minutes, tented with foil.

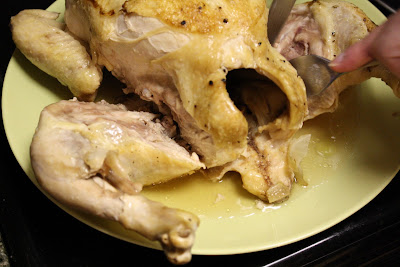
When you carve the chicken you're going to get puddles of juice. It's wonderful! We also put the jus from the pot through a fat separator, and then pour it over our chicken for some extra chickeny goodness!

From Kitchen Assays
Fresh out of the oven!

From Kitchen Assays
Juicy carving action!

From Kitchen Assays

Wednesday, January 27, 2010

Poaching Chicken is Handy (and Tasty!!)

Hello! We've been on a small break from writing due to some company visiting from colder climates and other such things. So we're finally sitting down to write about some of the better things we've cooked over the past few weeks.

One night a couple weeks ago we were craving some chicken tacos. We wanted to figure out the best way to make good chicken taco meat, so we decided to try poaching.  I've always been turned off by the word "poach" because it makes me think of boiling and bland, but it turns out it's the opposite of bland!  The chicken actually comes out juicy and flavorful.  Since poaching allows you to be creative with the flavors that go into the chicken, we could easily apply it to making some flavorful chicken for our tacos.

To start we placed the chicken in a pot (we used breasts with the bone in and skinned, but it could be any pieces). We then added whatever amount of left over chicken stock we had in the fridge, and then enough water to cover the chicken. You can use just water for poaching, but it's better to use stock to infuse more flavors into the chicken. We also threw in some liquid from a can of tomatoes that we drained since we were going to use the tomatoes later in the tacos.  We also threw in some garlic, onion, celery, oregano, red pepper, salt, and pepper. Basically, you can throw in whatever spices, herbs or aromatics you wish to flavor your chicken with. It's probably a good idea to use flavors in the poaching liquid to go along with the theme of the meal.

We brought it to a boil and then quickly turned it down to a simmer ( and covered the pot. We left it at a slow simmer for about 12 minutes  (10-15 minutes or so depending on the amount and thickness of the chicken... though it could be much longer if you have a few pounds of chicken in there).  After the simmer, we turned off the burner, and left the chicken in the poaching liquid for another 10-15 minutes before taking it out to cool. This allows the chicken to soak up all those good juices and flavors while it finishes cooking.  You can then use the chicken in recipes that require cooked chicken (like tacos) or eat it on its own (on a salad, yum).

We then sauteed some onions and tomatoes along with some seasoning in a fry pan. After the onions softened and browned a little, we tossed in our poached chicken and had ourselves some delicious chicken tacos topped with fresh chopped avocado. Yum!


From Kitchen Assays